%20Dark%20Background.png?width=100&height=75&name=Now%20Book%20It%20Logo%20Mono%20(Horizontal)%20Dark%20Background.png)
Create a booking
Drag and drop bookings
Create and manage waitlists
Create and manage blockouts
Create a Booking
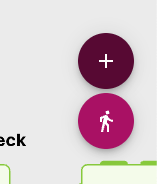
Bookings: Click the plus button on the right side of the floor plan
Walk-ins: Click the walk-in icon to the right side of the floor plan
On Status View
Click on available tables to create a booking directly
On Schedule View
Click on open time slots to create a booking directly

Booking Form
The above steps will open the booking form, and you can complete it as usual to make a booking.

Drag & Drop a Booking
To move bookings between tables easily, you can drag and drop the bookings between slots (in schedule view) and between tables (in status view).


Note: You can only drag and drop bookings or tables that match the current time period selected
Create and Manage Waitlists
Within the floor plan, you can assign a waitlist booking per the usual process.
If there is a table available, the booking card list and booking card will show a “T” symbol. You can then open the booking and select "Seat".

Floor plan now facilitates dragging and dropping from the booking card list to the floor plan to assign the waitlist booking to that table. Clicking and holding on a waitlist booking initiates drag and drop mode, and any available tables can be dropped onto, and any unavailable tables will be greyed out.

Waitlist drag and drop can only be initiated if the Floor Plan is on “Current” time. If the Floor Plan time is in the future or past, a user will not be able to drag and drop from the waitlist, and a warning will display.

Create and Manage Blockouts
Blockouts can be created in the floor plan view without the need to switch back to the Diary Timeline view.- You can create a blockout using the '3 dots' on the bottom right corner
- Create a blockout by table or by section

The functionality of blockouts remains the same when created in the floor plan or in the diary.