
Selecting a HTML Email Template
-
Log into Admin
-
Click on Venue > HTML Email Templates
-
Go to the ‘Select Email Template' drop down menu and select the relevant template
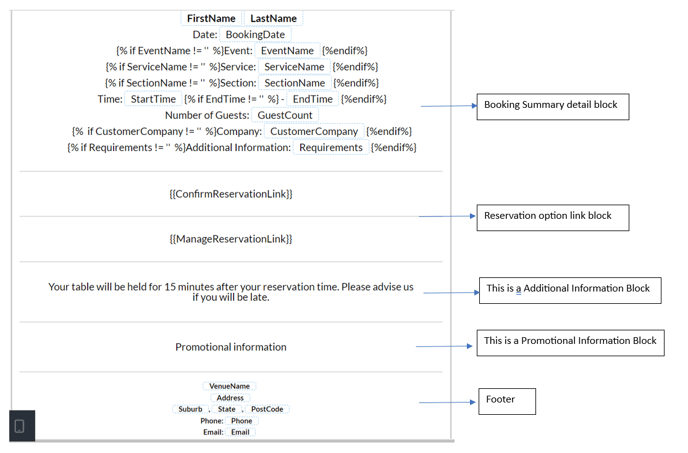
Names of the blocks in the templates
Features to add to the template
-
Content - text, images or HTML that can be added within a block on the template
-
Blocks - blocks with different sections that can be added to a template
-
Body - configuration for the block (text colour, font family etc)
-
Images - system images that can be added to the template
-
Uploads - where a user can upload their own images

Functions within HTML Email Templates
Adding a new block
-
Find where the block will go on the template
-
Click on the + to add a block

or click on ‘Blocks’ (see ‘Features to add to the template’ and drag it into place
-
Using the right hand menu add con
-
Either save the current template or create a new version
Saving a new version of the template
-
Make required changes
-
Click on ‘Save as a new version’

-
Click confirm on the popup

Save changes on current version (no new version is created)
-
Make required changes
-
Click on ‘Save’

-
Click on ‘Confirm’ to save the changes

Update logo or background image
-
Click on image (or content block)
-
On right hand menu > under image > select “Upload Image”

-
Choose your image and upload
-
Scroll down to section “Auto Width” > move the slider to resize the image and save

Updating the background colour - header and footer
-
Select a block
-
On the right hand menu under column properties choose “Background Color' option.

-
Pick a colour
-
Click on Save
Hiding information (not available on all blocks)
-
Select the block that needs hiding
-
On the right hand menu scroll to bottom to “Hide on Desktop”
Toggle ON - To hide the row
Toggle OFF - To show the information -
After making the selection, ensure the template is saved

Only available on the below templates
-
Successful email template: Tax Invoice, Additional Information and Promotional Information blocks
-
Confirmation email template: Additional and Promotional Information blocks
-
Cancelled Template: Promotional Information block
-
Reminder email template: Additional and Promotional Information block
Updating text in blocks (not available on all blocks)
-
Select the content block that requires an update
-
Edit the information
-
Use the available functions to change font, font size, alignment etc.

-
After updating, ensure the template is saved
Only available on the below templates
-
Successful email template: Additional Information block
-
Reminder email template: Additional Information block
-
Confirmation email template: Additional and Promotional Information blocks
-
Cancelled Template: Promotional Information block
-
Thank you Template: Promotional Information block
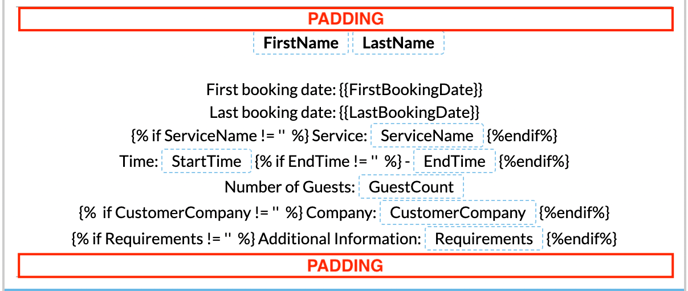
Amending the padding of a block
Padding is the space between the boarder and the text within a block. It is around the first line and the last line.
-
Select the block the needs amending
-
On the right hand side menu adjust the ‘Container Padding’ as required

Adding links to templates
-
Select the content block that requires an update
-
Highlight the text that needs to be a link

-
Click on the ‘Insert/Edit link’ button
-
Enter required details and click ‘Save’

-
After updating, ensure the template is saved
Only available on the below templates
-
Successful email template: Additional Information block
-
Reminder email template: Additional Information block
-
Confirmation email template: Additional and Promotional Information blocks
-
Cancelled Template: Promotional Information block
-
Thank you Template: Promotional Information block
Deleting a block (not available on all blocks)
-
Select the content block to be deleted from the template
-
Click on the bin icon at the bottom of the block

-
After deleting, ensure the template is saved

Only available on the below templates
-
Confirmation email template : Promotional Information block
Undo or redo changes made to a template
-
Go to the bottom of the screen
-
Click on the ‘undo’ or ‘redo’ arrows
Previewing templates
-
Go to the bottom of the screen
-
Click on the ‘eye’ icon

Formatting borders if a new block is added
-
Select the new block that was added to the template.
-
Then click on enable “More Options” for the Border on right hand side menu.

-
The Border setting should be set to following for the sides of the new block
-
Top = 0
-
Right = 2
-
Left = 2
-
Bottom = 0

-