%20Dark%20Background.png?height=120&name=Now%20Book%20It%20Logo%20Mono%20(Horizontal)%20Dark%20Background.png)
How to create a new service within your Schedule
A new service can be breakfast, lunch, and dinner, or even high teas or quiz nights. Services are created within your schedule, and generally relate to something that is offered on a particular day and time each week.
To create a service; from your Diary page, click on the three white lines in the top left hand corner of your screen and then click on Settings

This will bring you to your schedule - your schedule displays the services you offer on a given day
- Click on the day you are wanting to add the service to, and select Add Service
- At the Booking Interval tab, use the dropdown arrow to select how often you would like to accept bookings within the service (eg every 15 minutes) this can range from 5 minutes to 12 hours
There are 5 tabs within the service; which we recommend you work through sequentially
Service
- Service name; Enter the Name of your Service (this is visible to public).
- Service Type; Select from drop down menu Service Type (this field is only visible to the venue).
- Widget Description; You can enter information into the widget description that customers will see when they make a booking. Images and links to menus can be configured here
- Booking Colour; You can select a colour for your service, which will be used to highlight bookings in your diary. By assigning different colors to each service, you can enhance the clarity and organization of your diary, making it easier to navigate at a glance.
- Click NEXT to move to the next tab

Times
- Service Start Time; Enter in the Start time of your services.
- Last Booking Time; Enter in the Last booking time for that service.
- Service End Time; Enter in End time. (If your booking duration is 120 minutes, you should set the service end time to be 120 minutes after the last booking time. For instance, if your last booking time is 8 PM, the service end time should be adjusted to 10 PM.)
- Click NEXT to move to the next tab

- Default Booking Duration (minutes); This is how long you allow for each booking. The default dining time is 90 minutes (this can be amended from in the diary settings after initial configuration).
- Add Custom Duration: Here you can add a custom booking duration. For example, you may wish to allow more time for bookings larger bookings as they take longer to seat, take orders and complete payments

- Default Booking Pax; Here you can decide the minimum amount of pax you’d like to accept bookings for. This can be 1 pax but you may wish to make it 2 pax or even 4
- Maximum New Bookings Per Interval (empty is unlimited); here you can choose how many bookings you’d like to accept at any one interval (or time)
- Maximum New Covers Per Interval (empty is unlimited); in this field you can choose to limit how many covers you’d like to accept per interval
- Enable Custom Pax per interval; Selecting the Custom Pax per Interval option will display a field where you can set a custom number of customers (pax) allowed per timeslot. This overrides the Maximum New Covers per Interval setting. To make a timeslot unavailable, enter '0', and it will be removed from the booking widget. Leaving the field empty will default to the earlier Maximum New Covers setting.

- Allow in online booking system; Ensure this is ticked to ON to allow you to take bookings online.
Please note; To restrict the amount of bookings you want to accept during a booking interval (or time) this you can do so in three ways:
-
- Restrict via Bookings per interval. the physical amount of bookings you will take during this interval.
- Restrict via Covers per interval. the physical amount of people you can accept in the venue during this interval.
- Custom pax per interval; restrict bookings for certain intervals but not others
Select the Policy Agreement tick box.
9. Enter any policy-related information or links that you would like customers to see on the bookings widget.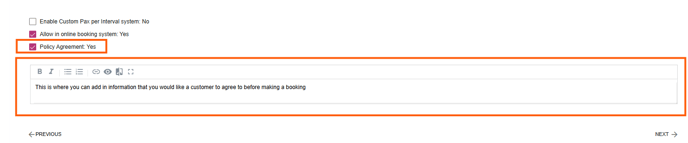
10. Click NEXT to move to the next tab
Sections and layouts
This will present you with all of the sections of your venue , and you can select which section/s of your venue you’d like to offer his service. You must select at least one section in order to offer the service
- Section Not used; select Section Not used if this section is not used for this service but may be used for another service at the running at the same time
- Section Closed; select Section Closed if you do not want to accept any bookings in this section during the times of this service
- Click NEXT to move to the next tab

5. Payments and Booking Options
In this section you can choose whether and how to apply a payment to your service, and apply booking options.
- No payment; If no payment is required at time of booking, leave the payment type as no payment
- You can also add a temporary booking option here; information on how to do that can be found here

-
Deposit: By selecting the Deposit option, you can require a deposit for each booking. You have the flexibility to specify the deposit amount and choose whether it is applied per person (pax) or for the entire booking.
-
Full Payment: Choosing the Full Payment option enables you to collect the total amount for each booking upfront. Similar to the deposit option, you can define the payment amount and decide whether it applies per person (pax) or for the overall booking.
- Upsell booking options – You can also choose to add upsell items from here; more information on adding upsell items can be found here
- Discount code; You can create a discount code that provides a specific dollar amount off the total cost before the customer finalizes their booking. Customers will need to input the discount code in the "Promotion Code" section during the online payment process. After entering the code, they should click "APPLY DISCOUNT," and the system will automatically subtract the discount from the total amount due.
- Booking Options; from here you can attach various booking options to your service. More information on Booking Options can be found here
Once you have completed all mandatory fields for the Service, hit Save at the bottom right corner.